It's Easy to Build: Custom docs project | Part 1 - MD to HTML
In this first part of the series - It's Easy to Build: Custom docs project, we'll learn how to convert our markdown text to an HTML code using Ruby.


Hey there, my blog has been in a stale model for a long time as I wrote my last blog post on 19th December 2020. So it is a long time. I was busy lurking over various places as I'm dirtying my hands in Blockchain. I hope you all are doing good and are standing firm during these testing times of COVID-19.
Introduction
Recently, I had a task to write my documentation for all my self-projects in a separate place other than GitHub's README. To accomplish this, I came across a few open-source projects like Slate Docs, Docusaurus, to name a few. They are useful in their ways, but they didn't fit my expectations. I also wanted my docs in my desityle library, which is impossible to achieve from these projects.
So I decided to build my own docs project, and it's live at Drabkirn Docs, and it's open-source. It took me a couple of days to learn things and complete this project, and in this tutorial series, I'll share my learnings as a beginner-friendly way.
For developers, writing docs is super-easy when we write it in markdown syntax, as writing in HTML will be a harrowing experience. That's why GitHub's README file looks simple clean with such a less code written in README.md file.
For this problem statement, I came up with this solution:
- I write my docs content in a markdown(MD) file.
- The app converts the above MD file content to an HTML code.
- We configure our app to include our desityle library, add our custom SEO tags and custom elements generation.
- We then inject this HTML code to our
index.htmlfile. - Then build our code to minify content and push to production.
In this part 1 tutorial of this series, we'll take a very first small step to learn how to convert a markdown code to an HTML code and inject this HTML code into an HTML file. To accomplish this, we'll use the Ruby language and redcarpet gem.
Getting Started

For this tutorial, you'll need Ruby installed in your machine. You can use this GoRails guide to setup ruby.
-
First, create a new folder and
cdinto it:$ mkdir mdtohtml $ cd mdtohtml -
Install the
redcarpetgem:- First, you need to create a file named
Gemfile$ touch Gemfile - Then add
redcarpetgem to this file:# Gemfile source 'https://rubygems.org' git_source(:github) { |repo| "https://github.com/#{repo}.git" } ruby '2.6.5' gem 'redcarpet', '~> 3.5'
- First, you need to create a file named
-
Install the dependencies:
$ bundle i -
Now create three files:
config.rb: We'll write our ruby code logic in this filehello.md: We'll write our markdown text in this fileinput.html: The output of the converted markdown text which will be injected in this file.$ touch config.rb $ touch hello.md $ touch input.html
Codebase:
Let's start writing the code:
-
First, open up your favorite editor and write a sample text in
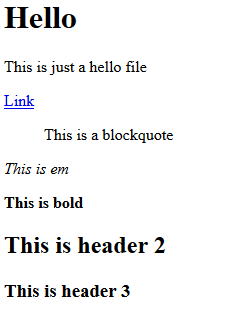
hello.mdfile# Hello This is just a hello file [Link](https://google.com) > This is a blockquote *This is em* **This is bold** ## This is header 2 ### This is header 3 -
Now, open the
config.rbfile and write our logic:# First, we need to import `redcarpet` library require 'redcarpet' # Now let us import our `hello.md` file and `index.html` file: ## For `hello.md`, we only give READ permission, so that we don't mess ## up with our markdown file ## For `index.html` we'll give RE-WRITE permission, that means ## Everytime the code parses, it will clean this file and re-enter code hello_md_text_file = File.open('./hello.md', 'r') index_html_file = File.open('./index.html', 'w+') # Now we'll initialize Redcarpet: ## For now, we'll not use any options, we'll keep this simple md_renderer_options = {} md_extensions = {} md_renderer = Redcarpet::Render::HTML.new(md_renderer_options) markdown = Redcarpet::Markdown.new(md_renderer, md_extensions) # Read the contents of `hello.md` file and put it in `md_text` variable md_text = hello_md_text_file.read # convert MD to HTML, put it in `md_to_html_text` variable md_to_html_text = markdown.render(md_text) # Now inject this HTML content in `index.html` file index_html_file.puts md_to_html_text # Now, close the files hello_md_text_file.close index_html_file.close- This was simple; everything is explained in the code comments above, and to summarize:
- We first import the
redcarpetgem - Then we import the
hello.mdandindex.htmlfiles - We'll then initialize
redcarpetwith no options to keep things simple. - We then convert our markdown text to HTML code and inject this code to
index.htmlfile - Finally, we close both the files as a good practice.
-
Running the script:
- Run the script by using this command:
$ ruby config.rb
- Run the script by using this command:
-
Now, in the
index.htmlfile, you'll see the MD to HTML converted code.
Testing it:

We finished with the coding part, now let's test it out:
-
Most of the modern machines have
pythoninstalled, so we'll useSimpleHTTPServerto fire up our server, you can use any server:$ python -m SimpleHTTPServer 3000 # Or any other web server -
Now, visit
localhost:3000or$YOUR_IP:3000, to the see yourindex.htmlfile. It looks like this:
-
To summarize, here is how the workflow will work from now:
- You keep adding more content to
hello.mdfile - Then, run the script:
$ ruby config.rb - The above command will update the
index.htmlfile. - Now, refresh your webpage, and you'll see the updated markdown to HTML code.
- You keep adding more content to
Summary and conclusion
Let's take a quick look at what we learned today:
- First of all, I introduced myself, so don't forget to connect with me at Twitter or elsewhere.
- Next, we described and understood our problem statement.
- We then outlined a solution to our problem statement, and this tutorial is a partial solution to our big problem statement.
- Then we saw what the prerequisites are, and we also set up and understood our file structure for this tutorial.
- We then wrote our ruby code logic to solve our problem, i.e., converting a markdown text to HTML code and injecting it into an
index.htmlfile. - Next, we tested our
index.htmlfile by firing up a server. - We then defined what our workflow will be for adding more content to our
hello.mdfile. - Finally, we took a quick look at this very summary...
That's it and Let there be the end. 🙏